How to repot an Alocasia Zebrina
Alocasia Zebrinas can grow quite quickly in the spring and summer. If your has, you might need to repot it to a bigger pot. In this plant care guide, we'll have a look at how you can repot your Alocasia Zebrina and help it grow.
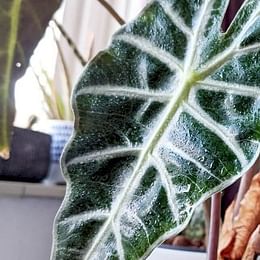
Alocasia Zebrina before repotting
 If you're taking great care of your Alocasia Zebrina, it'll grow larger and larger. If you're having trouble with growing this plant, be sure to check out my other guide How to care for an Alocasia Zebrina. This will tell you exactly what you need to know to grow this plant and to eventually end up in this situation: My plant is too large and I need to repot it! That's where this guide comes in, I'm going to show you the process for repotting the Alocasia Zebrina, including photos. The process goes from taking the plants out of the pot, all the way to planting the two separate plants in two pots.
You can also keep the two plants together and repot them into a bigger pot. In this case, you can just pull your plants out of their current pot and place them in a bigger pot. After you've done that, add soil until the pot is full. But that's not what we're going to focus on for this guide. We're going to completely repot the Alocasia Zebrina in a new pot, by removing all of the soil from its roots.
These are the steps we'll be going through in this guide:
Let's learn how to repot an Alocasia Zebrina!
How often should an Alocasia Zebrina be repotted?
When it comes to repotting your Alocasia Zebrina, it's important to keep a few things in mind. These beautiful plants have a fast growth rate, especially when they're happy in their environment. However, how often you should repot your Alocasia Zebrina will depend on a few different factors.
First, pay attention to the size of your plant. Alocasia Zebrina can quickly outgrow their pots if they're growing well, so if you notice that your plant is starting to look cramped or its roots are peeking out from the drainage holes, it's time to repot. Generally speaking, you should aim to repot your Alocasia Zebrina every 12-18 months or so.
Another important thing to consider is the soil in which your plant is currently potted. If you notice that the soil is looking compacted, or if there is a lot of dead or decaying organic matter, it's a good idea to repot your plant.
It's also important to keep an eye on any signs of stress or disease in your plant. If you notice that your Alocasia Zebrina is struggling, it may be a good idea to repot it into fresh soil to give it a fighting chance.
You should now have a good idea if you need to repot your Alocasia, so let's figure out what type of soil we'll need!
Choosing the right soil for repotting
When it comes to repotting Alocasia Zebrina, it is important to choose the right type of soil to help our plant thrive. This plant prefers light, well-draining soil that is rich in nutrients and retains some moisture. A good mix for Alocasia Zebrina would be a combination of 1/3 general potting soil, 1/3 peat moss, and 1/3 perlite for proper drainage.
Now that we've got the right type of soil for the Alocasia Zebrina, it's time to prepare the plant for repotting!
Should the plant be watered before repotting?
Before repotting your plant, it's a good idea to water your plant a day or two before repotting. This helps make sure that the soil and roots are hydrated enough before being uprooted and transferred to a new container. However, remember not to overwater the plant, as clogged soil can be challenging to work with and may cause root damage during the repotting process.
Watering before repotting also allows the soil to settle, making it easier to remove the plant from its current container. Give your plant a good drink the day before repotting – your Alocasia will thank you for it!
If you let the soil dry out completely, repotting your plant is less messy, but it'll be more difficult for the soil to absorb water as soon as it has been placed in its new, larger pot. Luckily this is not a permanent issue and as soon as you water the dry soil in the larger pot, it'll slowly start to soak up the moisture.
Now, let's repot our Alocasia!
Pull the plant out of the pot and check the roots
The most important reason for repotting a plant is to give it more space to grow. In my case, this meant that I had to separate two different plants into two pots. They were getting in each other's way and both needed more space for themselves to keep growing. Before you repot your plant, you'll want to check the roots. Do the roots still have enough space to grow or are they having trouble finding new places to grow? To check the roots, pull the plant out of your pot and check if the roots are similar to the picture below:

Alocasia Zebrina has grown some serious roots
The roots took over the whole pot and even started to circle the pot at the bottom. This means the plant needs to be repotted, it doesn't have the space it needs to grow any further. If you're encountering something that looks a bit like the roots in the photo, you can choose to just repot everything into a bigger pot or separate the two plants. As I said earlier, the plants were getting in each other's way, so I chose the latter. This meant I had to start to separate the roots.
Remove the dirt from the roots
Since I wanted to separate the two plants into two different pots, I had to remove the dirt from the roots. This is an optional step, but if you're also separating two or more plants, you'll need to do this as well.
Removing the dirt from the roots makes it much easier to keep the roots intact when you're separating the two plants. The roots are very tangled and just by ripping the plants apart, you risk killing them. I took a very cautious approach and removed most of the dirt before attempting to separate the plants.
By removing the dirt, it's much easier to untangle the roots by looking at them, but the Alocasia roots are also clinging to the dirt. This means they don't want to let go. So simply pulling the roots will most likely damage them. To give the separate plants the best chance of survival, make sure you keep a large majority of the roots.

The Alocasia Zebrina is clinging to the dirt
At the point in time when this photo was taken, removing the dirt got pretty difficult. There were so many roots that it took at least 20 minutes before I was able to remove almost all of the dirt from the roots. The roots were doing their best to hold onto the dirt. This meant I had to dig in this ball of dirt and roots with my fingers for a while until the roots were mostly clean and I could see how they were tangled up.
Separate the plants

Alocasia Zebrina with clean roots, after the dirt is removed
After you've removed the dirt from the roots, it's quite easy to untangle the roots. You should have something like this picture. You can see it's two different plants, with each their own roots. If you've been careful with removing the dirt from the roots, untangling should be quite easy and you should have very minimal damage to the roots and the stems of the plant. I didn't have any damage myself, the stems and leaves were still looking great and I couldn't see any problems.
As you can see, the roots are very complex and are built to hold onto the dirt. It took a while to get clean, but when it was clear in the end, it was easy to deal with. Now that you've separated the plants you can go to the next step.
Maintaining the plant's roots
When repotting your plants, it's important to pay close attention to the roots. If you notice any damage, it's important to handle them carefully to avoid causing further harm. Here are some key tips to help you handle and trim damaged roots during repotting:
-
Be gentle: Roots are delicate and can easily break or become damaged, especially during repotting. When handling them, be sure to be gentle and avoid tugging or pulling too hard.
-
Use sharp, clean scissors: When trimming damaged roots, it's important to use clean, sharp scissors to avoid further damage. Dull or dirty scissors can cause more harm than good.
-
Cut away only the damaged areas: When trimming roots, be sure to only cut away the damaged areas. This will help promote healthy regrowth and prevent further damage.
-
Don't cut too much: While it may be tempting to cut away all of the damaged roots, it's important not to go overboard. Cutting too much can shock the plant and cause it to have trouble recovering.
Your plant will have more space to grow and by trimming the damaged roots, you're promoting new root growth. This helps the plant to settle in its new pot a little more easily.
Preparing the new pot
When preparing a new pot for repotting, it is important to consider a few factors such as size, type, and drainage.
The size of the new pot should be slightly larger than the current pot the plant is in. This allows for the plant to have enough room to grow and prevents it from becoming root-bound. However, be careful not to choose a pot that is too large as this can lead to overwatering and root rot.
Also, consider the type of pot that would best suit your plant. Clay pots are great for plants that love dry soil as they are porous and allow excess moisture to evaporate. On the other hand, plastic pots are better for plants that require more water as they retain moisture better.
Make sure that the new pot has proper drainage to prevent water from sitting at the bottom of the pot and drowning the roots. You can either choose a pot that already has drainage holes or create them yourself by drilling or punching holes at the bottom of the pot.
Plant each plant into its own pot

Alocasia Zebrina's after repotting them into separate pots
Now the exciting part is finally happening, you get to plant these beautiful plants in their own pot. As described in my previous guide about the Alocasia Zebrina How to care for an Alocasia Zebrina, I keep the plant in the nursery pot. This has the sole reason that it's very easy to water a plant like that.
The bigger pots they're in don't have any draining holes, so keeping the plants in the nursery pot helps me to drain the excess water from the pot instead of it sitting at the bottom of the pot.
To plant these Alocasia's, you should prepare some soil to pot your plants in. This Alocasia likes soil that's very well draining. You can reuse the soil you used before and supplement it with some fertilizer and some additional soil. This will give your plant plenty of vitamins to keep growing and settling into its new environment quickly and smoothly.
I watered my plants right away, just to give them a chance to soak up the nutrients. If you've just watered your Alocasia's and the stems are not drooping yet, you should wait a few days. You don't want to overwater your plants.
Now keep a close eye on the moisture levels in the soil and water the plant when you see it's starting to droop, just like you have before. The plant should get adjusted to the new environment in a few days to a week.
Care instructions following repotting
After repotting, it's important to provide your plant with the right kind of care to make sure it thrives in its new home. Here are a few tips to keep in mind:
-
Watering: Make sure to water your plant thoroughly after repotting. You want the soil to be moist but not waterlogged. Avoid overwatering, as this can lead to root rot. By watering your plant after repotting, you help the new soil to settle around the plant, carefully removing air bubbles.
-
Light: The Alocasia Zebrina loves bright indirect light, so after repotting it's a good idea to give it this type of light. It'll help the plant to recover from being repotted and will promote growth.
-
Fertilizing: While it's not necessary to fertilize immediately after repotting, you may want to consider giving your plant a boost in the weeks following repotting. Use a balanced fertilizer according to the package instructions. If it's currently fall or winter, it's best to wait until spring to fertilize your Alocasia.
-
Monitoring: Keep an eye on your plant in the weeks following repotting. Look for any signs of stress, such as wilting or yellowing leaves. If you notice any issues, adjust your care routine accordingly. Most importantly, don't panic if your plant doesn't respond well to being repotted. This plant is very tough and will survive, even if it loses all its stems and leaves.
Thank you for reading this post! I hope it helps you to keep your plants healthy and beautiful! If you're looking for more guides on specific plants, you can always request a plant guide to get a guide for the plant you have trouble with.
Test your plant care knowledge
Quiz completed!
Want to learn more? Sign up for my newsletter to receive free tips in your inbox!
Sign up now!